 top part of body:
rnd 1: ch 2, 6sc in 2nd ch, place marker
rnd 2: *2sc* around (12sc)
work in both loops from now on
rnd 3:*sc in next st, 2sc in next st* (18)
rnd 4: *sc in next 2st, 2sc in next st* (24)
rnd 5: *sc in next 3st, 2sc in next st* (30)
rnd 6: *sc in next 4st, 2sc in next st* (36)
rnds7-11: *sc*
rnd 12: *sc in next 4st, sc dec* (30)
rnd 13: *sc in next 3st, sc dec* (24)
rnd 14: *sc in next 2st, sc dec* (18)
rnd 15: *sc*
rnd 16: ch2 (counts as first hdc) 2hdc in same st, sc in next st
*3hdc in next st, sc in next st* join
finish off, weave in ends
bottom part of body:
rnd 1: ch 2, 6sc in 2nd ch, place marker
rnd 2: *2sc* around (12sc)
rnd 3: *sc in next st, 2sc in next st* (18)
rnds 4-5: *sc*
finish off leaving a long end for sewing to top part of body
stuff body, and sew bottom part to rnd 15 of body
legs: make 8:
rnd 1: ch 2, 6sc in 2nd ch, place marker
rnd 2: *2sc* around (12sc)
rnds 3-6: *sc*
finish off, leaving a long end for sewing to body
assembly:
stuff each leg lightly, sew closed
sew each leg to bottom piece of body, you may need to overlap the legs a bit or all eight won't fit
attach eyes between rnds 9 & 10 of body about 2" apart from each other
top part of body:
rnd 1: ch 2, 6sc in 2nd ch, place marker
rnd 2: *2sc* around (12sc)
work in both loops from now on
rnd 3:*sc in next st, 2sc in next st* (18)
rnd 4: *sc in next 2st, 2sc in next st* (24)
rnd 5: *sc in next 3st, 2sc in next st* (30)
rnd 6: *sc in next 4st, 2sc in next st* (36)
rnds7-11: *sc*
rnd 12: *sc in next 4st, sc dec* (30)
rnd 13: *sc in next 3st, sc dec* (24)
rnd 14: *sc in next 2st, sc dec* (18)
rnd 15: *sc*
rnd 16: ch2 (counts as first hdc) 2hdc in same st, sc in next st
*3hdc in next st, sc in next st* join
finish off, weave in ends
bottom part of body:
rnd 1: ch 2, 6sc in 2nd ch, place marker
rnd 2: *2sc* around (12sc)
rnd 3: *sc in next st, 2sc in next st* (18)
rnds 4-5: *sc*
finish off leaving a long end for sewing to top part of body
stuff body, and sew bottom part to rnd 15 of body
legs: make 8:
rnd 1: ch 2, 6sc in 2nd ch, place marker
rnd 2: *2sc* around (12sc)
rnds 3-6: *sc*
finish off, leaving a long end for sewing to body
assembly:
stuff each leg lightly, sew closed
sew each leg to bottom piece of body, you may need to overlap the legs a bit or all eight won't fit
attach eyes between rnds 9 & 10 of body about 2" apart from each other
Sunday, March 1, 2009
octopus amigurumi
This was one of the first amigurumi patterns that I plaid with. Link here.
top part of body:
rnd 1: ch 2, 6sc in 2nd ch, place marker
rnd 2: *2sc* around (12sc)
work in both loops from now on
rnd 3:*sc in next st, 2sc in next st* (18)
rnd 4: *sc in next 2st, 2sc in next st* (24)
rnd 5: *sc in next 3st, 2sc in next st* (30)
rnd 6: *sc in next 4st, 2sc in next st* (36)
rnds7-11: *sc*
rnd 12: *sc in next 4st, sc dec* (30)
rnd 13: *sc in next 3st, sc dec* (24)
rnd 14: *sc in next 2st, sc dec* (18)
rnd 15: *sc*
rnd 16: ch2 (counts as first hdc) 2hdc in same st, sc in next st
*3hdc in next st, sc in next st* join
finish off, weave in ends
bottom part of body:
rnd 1: ch 2, 6sc in 2nd ch, place marker
rnd 2: *2sc* around (12sc)
rnd 3: *sc in next st, 2sc in next st* (18)
rnds 4-5: *sc*
finish off leaving a long end for sewing to top part of body
stuff body, and sew bottom part to rnd 15 of body
legs: make 8:
rnd 1: ch 2, 6sc in 2nd ch, place marker
rnd 2: *2sc* around (12sc)
rnds 3-6: *sc*
finish off, leaving a long end for sewing to body
assembly:
stuff each leg lightly, sew closed
sew each leg to bottom piece of body, you may need to overlap the legs a bit or all eight won't fit
attach eyes between rnds 9 & 10 of body about 2" apart from each other
pencil case from mailing tube
This one is from Craft Chi Office Crafts

Materials: - Mailing Tube w/2 endcaps - Fabric remnants - Small hinges and clasp (used for small wooden boxes) - Brads and eyelets (the scrapbook types work great) - Appx. 2 feet of ribbon (optional for handles) - Spray paint for plastic or spray paint and plastic primer (optional) - Spray Adhesive - Glue Stick - A piece of cardstock or a cereal box
Tools: - Iron - Small hacksaw (or heavy duty scissors and hand strength work too) - Small vice (if using a hacksaw) - Awl - Eyelet setter (optional) - Leather punch (optional)
1. Cut the mailing tube to desired length. Secure the tube in a vice and cut using a small hacksaw. Mine is about 8″ long. Make sure it’s long enough for the pens/pencils you want to put into it. Heavy duty scissors also work but require more hand strength.

2. Cut the tube in half lengthwise. Once again, using the vice to hold the tube in place. Make sure to mark a straight line if using scissors.

3. Sand the edges, gently, just to remove any rough bits, using a fine grit sand paper.

4. Prep the outside fabric. Cut a piece of fabric 2″ longer and wider than the size of each tube half to allow for a 1″ overlap on all sides. I pieced together this fabric because I liked the look.

5. Adhere the outside fabric by spraying adhesive on the outside of the tube and centering the fabric on it. Then wrap the extra fabric around to the interior and secure with glue stick. Glue the corners first and then glue the sides to get a nice mitered corner.

Here the pieces are after they’ve been covered.

6. Prep the interior fabric. Cut a piece of fabric to the exact size of the interior each half of mailing tube. Then, use glue stick to fold in the sides by 1/2 inch.
When glueing, a piece of wax paper under the fabric allows you to put glue on the edge.

Fold the fabric in by 1/2″ and press down. I used my cutting mat to help me get the fold nice and even.
Iron the fold to set it more securely. Do this to all 4 sides.

7. Adhere the interior fabric. Now spray the wrong side of the fabric with spray adhesive and attach to the interior of the tube half.

8. Prep the tube caps. Spray paint the tube caps (optional) using a spray paint suitable for plastic or use a clear plastic primer first. Allow each coat to dry thoroughly.

9. Cover the endcaps with fabric. Use the larger side of the endcap to trace a circle onto cardstock. Cut the circle out using scissors.

Use glue stick to glue the cardstock circle onto a piece of fabric.

With the glue stick, put glue along the edges of the circle and fold the fabric over the edges. Iron to set.

10. Glue the fabric circle to the endcap. Squeeze craft glue around the rim edge of the endcap and place your fabric circle on the glue. Allow to dry thouroughly.

11. Once the fabric circle is glued down and dry. Glue the endcap to inside end of one half of the tube. Put craft glue on the interior of the short side of one half of the tube and set the covered, endcap in place.

Glue the endcap to the end of one half of the tube. Now, glue the other endcap to the other end of the same half.

12. Attach the hinges. Measure and mark the location of your hinges on the long side edges of the tube halves.

Use an awl to drive a hole through the tube and fabric.

Secure the hinges with decorative brads.

Secure the brads on the inside of the tube by folding them over. Here’s a view of the brads from the inside of the case.

13. Attach the clasp the same way as the hinges. Measure and mark, then use an awl to punch the holes and secure with brads.

14. Create the handles. Measure and mark where you’d like the handles to be.

Punch larger holes using a leather punch or a snap-setter/punch.

Insert and set eyelets.


Insert a piece of ribbon for the handle. Secure with a knot on the interior.

This case has plenty of space to be used as small purse or a lunch box.
Tuesday, February 3, 2009
knitted hat pattern
I'm not really a hat person, spend too much time trying to get my hair to lay perfectly flat. But I thought this one was really cute, and the girl looks just like someone I went to high school with. Anyway... I got this pattern from a live journal post at some point.
Materials:
Less than half of a 6-oz skein of TLC Baby in Pinkie
Set of double-pointed needles US size 6 (4 mm)
Tapestry needle
Gauge: 18 sts per 4 inches in k2tog,yo pattern
Size: I have a large head and thick hair (about 23" around), and this cap is made to fit loosely. So if you have a smaller head or want a tighter fit, you can either subtract 4 sts for every inch (approx) difference in head size, or just use thinner yarn with a tighter gauge to get the right fit. Or you can make it as is, and it might turn out with more of a beret or tam look.
Cast on 108 sts and distribute to 3 dpns (36 on each). Join to work in the round, being careful not to twist. Work 6 rounds in k2,p2 ribbing.
Lace Pattern:
Round 1: *k2tog, yo*; repeat between*s around.
Round 2: knit around.
Repeat these 2 rounds 17 more times.
Crown Shaping:
Round 1: *k2tog, [k2tog, yo] 8 times*; repeat between *s around - 102 sts rem.
Round 2 and all even rounds: knit around.
Round 3: *k3tog, yo, [k2tog, yo] 7 times*; repeat between *s around - 96 sts.
Round 5: *k2tog, [k2tog, yo] 7 times*; repeat between *s around - 90 sts.
Round 7: *k3tog, yo, [k2tog, yo] 6 times*; repeat btween *s around - 84 sts.
Round 9: *k2tog, [k2tog, yo] 6 times*; repeat between *s around - 78 sts.
Round 11: *k3tog, yo, [k2tog, yo] 5 times*; repeat btween *s around - 72 sts.
Round 13: *k2tog, [k2tog, yo] 5 times*; repeat between *s around - 66 sts.
Round 15: *k3tog, yo, [k2tog, yo] 4 times*; repeat btween *s around - 60 sts.
Round 17: *k2tog, [k2tog, yo] 4 times*; repeat between *s around - 54 sts.
Round 19: *k3tog, yo, [k2tog, yo] 3 times*; repeat btween *s around - 48 sts.
Round 21: *k2tog, k2tog, yo*; repeat between *s around - 36 sts.
Round 23: *k3tog, yo*; repeat between *s around - 24 sts.
Round 25: *k2tog, k2tog, yo*; repeat between *s around - 18 sts.
Round 27: k2tog around - 9 sts.
Cut yarn, leaving a 6-inch tail. Use tapestry needle to thread end through remaining loops. Put tight and tie off. Weave in ends.
Quant or scarf
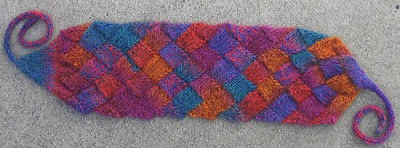 This is one of my favorite patterns. At first it was impossibly hard, but eventually it got much easier. It's similar to the pattern that I posted for dish-cloths. I followed this pattern for a Quant that I found on Knitty and adapted it for a scarf.
I used the same Crystal Palace Yarns: Taos that they used in the picture. If I was to do it again I would probably use something else. It wasn't very soft (especially since I was making a scarf) and it was impossible to undo. I can't tell you how much i wasted trying to take apart what I had done and not being able to. I defiantly wont try and learn a new and complex pattern with that yarn. But, in its defense, it is beautiful, these pictures do not do it justice at all. And the length of the variegate is perfect for this pattern.
This is one of my favorite patterns. At first it was impossibly hard, but eventually it got much easier. It's similar to the pattern that I posted for dish-cloths. I followed this pattern for a Quant that I found on Knitty and adapted it for a scarf.
I used the same Crystal Palace Yarns: Taos that they used in the picture. If I was to do it again I would probably use something else. It wasn't very soft (especially since I was making a scarf) and it was impossible to undo. I can't tell you how much i wasted trying to take apart what I had done and not being able to. I defiantly wont try and learn a new and complex pattern with that yarn. But, in its defense, it is beautiful, these pictures do not do it justice at all. And the length of the variegate is perfect for this pattern. Here is how I retyped the pattern so it was easier for me to follow when knitting a scarf from it. I never was able to finish it, so I haven't yet figured out how I'm going to fill in to bind off. If anyone gets there before me, let me know
Cast on 45 stitches
Base Triangle
Row 1 [RS]: K1, turn work.
Row 2 [WS]: P1, turn work.
Row 3 [RS]: Sl 1, k1, turn work.
Row 4 [WS]: P2, turn work.
Row 5 [RS]: Sl 1, k2, turn work.
Row 6 [WS]: P3, turn work.
Row 7 [RS]: Sl 1, k3, turn work.
Row 8 [WS]: P4, turn work.
Row 9 [RS]: Sl 1, k4, turn work.
Row 10 [WS]: P5, turn work.
Row 11 [RS]: Sl 1, k5. Do not turn work.
---Repeat the below instructions about ten times---
Left Edge
Row 1 [WS]: K1, turn work.
Row 2 [RS]: Kfb, turn work.
Row 3 [WS]: K1, p2tog, turn work.
Row 4 [RS]: K1, m1, k1, turn work.
Row 5 [WS]: k1, p1, p2tog, turn work.
Row 6 [RS]:
Right Slanting Center Diamond
Row 1 [WS]: Pick up and p 6 sts along edge of next base triangle. Sl last picked-up st to left needle, p2tog with next st on needle. Turn work.
Row 2 [RS]: K6, turn work.
Row 3 [WS]: Sl 1, p4, p2tog, turn work.
Row 4 [RS]: K6, turn work.
Row 5 [WS]: Sl 1, p4, p2tog, turn work.
Row 6 [RS]: K6, turn work.
Row 7 [WS]: Sl 1, p4, p2tog, turn work.
Row 8 [RS]: K6, turn work.
Row 9 [WS]: Sl 1, p4, p2tog, turn work.
Row 10 [RS]: K6, turn work.
Row 11 [WS]: Sl 1, p4, p2tog. Do not turn work; diamond is complete.
Right edge Triangle
Note: The remaining st of the Right Edge Triangle from Section 1 counts as the first picked-up st for the first diamond in Section 2. When working this diamond, instead of picking up 6 sts, slip the remaining st to the right needle, then pick up and k 5 sts.
Row 1 [WS]: Pick up and p6 sts along edge of next base triangle or diamond. Turn work.
Row 2 [RS]: K6, turn work.
Row 3 [WS]: Sl 1, p3, k2tog, turn work.
Row 4 [RS]: K5, turn work.
Row 5 [WS]: Sl 1, p2, k2tog, turn work.
Row 6 [RS]: K4, turn work.
Row 7 [WS]: Sl 1, p1, k2tog, turn work.
Row 8 [RS]: K3, turn work.
Row 9 [WS]: Sl 1, k2tog, turn work.
Row 10 [RS]:
Left Slanting Diamond
Row 1 [RS]: Pick up and k6 sts along edge of next triangle or diamond. Sl last picked-up st to left needle, ssk with next st on needle. Turn.
Row 2 [WS]: P6, turn work.
Row 3 [RS]: Sl 1, k4, ssk, turn work.
Row 4 [WS]: P6, turn work.
Row 5 [RS]: Sl 1, k4, ssk, turn work.
Row 6 [WS]: P6, turn work.
Row 7 [RS]: Sl 1, k4, ssk, turn work.
Row 8 [WS]: P6, turn work.
Row 9 [RS]: Sl 1, k4, ssk, turn work.
Row 10 [WS]: P6, turn work.
Row 11 [RS]: Sl 1, k4, ssk.
Do not turn work; diamond is complete.
Subscribe to:
Posts (Atom)
