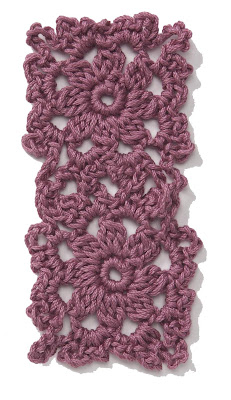
 CL2 (2-dc Bobble) [Yo and draw up a lp, yo and draw through 2 lps on hook] twice, yo and draw through all 3 lps on hook.
CL3 (3-dc Bobble) [Yo and draw up a lp, yo and draw through 2 lps on hook] 3 times, yo and draw through all 4 lps on hook. First Motif (ch 4, join with sl st to form ring)
Rnd 1 Ch 1, 8 sc in ring, join with sl st to first sc.
Rnd 2 (Ch 3, CL2) in first sc, ch 4, [CL3 in next sc, ch 4] 7 times—8 clusters. Join with sl st to top of beg CL2.
Rnd 3 Sl st in first ch-4 sp, ch 1, *(1 sc, ch 2, 1 sc, ch 4, 1 sc) in next ch-4 sp, ch 8, (1 sc, ch 4, 1 sc, ch 2, 1 sc) in next ch-4 sp; rep from * around. Join with sl st to first sc. Fasten off. Second and All Remaining Motifs Work as first motif through rnd 2. Joining
Work rnd 3 as first motif, joining motifs in corresponding ch-8 corners or ch-4 lps as foll:
Ch-8 Corners Ch 4 on rnd 3 of 2nd motif, drop lp from hook, insert hook from front to back through corresponding ch-8 lp on first motif, pick up dropped lp of 2nd motif, ch 4, cont to work rnd 3 on 2nd motif as established.
Ch-4 Lps Ch 2 on rnd 3 of 2nd motif, drop lp from hook, insert hook from front to back in corresponding ch-4 lp on first motif, pick up dropped lp of 2nd motif, ch 2, cont to work rnd 3 of 2nd motif as established.
CL2 (2-dc Bobble) [Yo and draw up a lp, yo and draw through 2 lps on hook] twice, yo and draw through all 3 lps on hook.
CL3 (3-dc Bobble) [Yo and draw up a lp, yo and draw through 2 lps on hook] 3 times, yo and draw through all 4 lps on hook. First Motif (ch 4, join with sl st to form ring)
Rnd 1 Ch 1, 8 sc in ring, join with sl st to first sc.
Rnd 2 (Ch 3, CL2) in first sc, ch 4, [CL3 in next sc, ch 4] 7 times—8 clusters. Join with sl st to top of beg CL2.
Rnd 3 Sl st in first ch-4 sp, ch 1, *(1 sc, ch 2, 1 sc, ch 4, 1 sc) in next ch-4 sp, ch 8, (1 sc, ch 4, 1 sc, ch 2, 1 sc) in next ch-4 sp; rep from * around. Join with sl st to first sc. Fasten off. Second and All Remaining Motifs Work as first motif through rnd 2. Joining
Work rnd 3 as first motif, joining motifs in corresponding ch-8 corners or ch-4 lps as foll:
Ch-8 Corners Ch 4 on rnd 3 of 2nd motif, drop lp from hook, insert hook from front to back through corresponding ch-8 lp on first motif, pick up dropped lp of 2nd motif, ch 4, cont to work rnd 3 on 2nd motif as established.
Ch-4 Lps Ch 2 on rnd 3 of 2nd motif, drop lp from hook, insert hook from front to back in corresponding ch-4 lp on first motif, pick up dropped lp of 2nd motif, ch 2, cont to work rnd 3 of 2nd motif as established.
Showing posts with label Crochet. Show all posts
Showing posts with label Crochet. Show all posts
Tuesday, February 3, 2009
crochet stich
Here is a pretty crochet stitch from Lion Brand Yarn called Alone Together. It is one of the hundreds that they have in their Stitch-Finder section. You may have to have a free account with them to access their patterns and stitches. Wouldn't this make an adorable blanket?
CL2 (2-dc Bobble) [Yo and draw up a lp, yo and draw through 2 lps on hook] twice, yo and draw through all 3 lps on hook.
CL3 (3-dc Bobble) [Yo and draw up a lp, yo and draw through 2 lps on hook] 3 times, yo and draw through all 4 lps on hook. First Motif (ch 4, join with sl st to form ring)
Rnd 1 Ch 1, 8 sc in ring, join with sl st to first sc.
Rnd 2 (Ch 3, CL2) in first sc, ch 4, [CL3 in next sc, ch 4] 7 times—8 clusters. Join with sl st to top of beg CL2.
Rnd 3 Sl st in first ch-4 sp, ch 1, *(1 sc, ch 2, 1 sc, ch 4, 1 sc) in next ch-4 sp, ch 8, (1 sc, ch 4, 1 sc, ch 2, 1 sc) in next ch-4 sp; rep from * around. Join with sl st to first sc. Fasten off. Second and All Remaining Motifs Work as first motif through rnd 2. Joining
Work rnd 3 as first motif, joining motifs in corresponding ch-8 corners or ch-4 lps as foll:
Ch-8 Corners Ch 4 on rnd 3 of 2nd motif, drop lp from hook, insert hook from front to back through corresponding ch-8 lp on first motif, pick up dropped lp of 2nd motif, ch 4, cont to work rnd 3 on 2nd motif as established.
Ch-4 Lps Ch 2 on rnd 3 of 2nd motif, drop lp from hook, insert hook from front to back in corresponding ch-4 lp on first motif, pick up dropped lp of 2nd motif, ch 2, cont to work rnd 3 of 2nd motif as established.
CL2 (2-dc Bobble) [Yo and draw up a lp, yo and draw through 2 lps on hook] twice, yo and draw through all 3 lps on hook.
CL3 (3-dc Bobble) [Yo and draw up a lp, yo and draw through 2 lps on hook] 3 times, yo and draw through all 4 lps on hook. First Motif (ch 4, join with sl st to form ring)
Rnd 1 Ch 1, 8 sc in ring, join with sl st to first sc.
Rnd 2 (Ch 3, CL2) in first sc, ch 4, [CL3 in next sc, ch 4] 7 times—8 clusters. Join with sl st to top of beg CL2.
Rnd 3 Sl st in first ch-4 sp, ch 1, *(1 sc, ch 2, 1 sc, ch 4, 1 sc) in next ch-4 sp, ch 8, (1 sc, ch 4, 1 sc, ch 2, 1 sc) in next ch-4 sp; rep from * around. Join with sl st to first sc. Fasten off. Second and All Remaining Motifs Work as first motif through rnd 2. Joining
Work rnd 3 as first motif, joining motifs in corresponding ch-8 corners or ch-4 lps as foll:
Ch-8 Corners Ch 4 on rnd 3 of 2nd motif, drop lp from hook, insert hook from front to back through corresponding ch-8 lp on first motif, pick up dropped lp of 2nd motif, ch 4, cont to work rnd 3 on 2nd motif as established.
Ch-4 Lps Ch 2 on rnd 3 of 2nd motif, drop lp from hook, insert hook from front to back in corresponding ch-4 lp on first motif, pick up dropped lp of 2nd motif, ch 2, cont to work rnd 3 of 2nd motif as established.


Friday, January 30, 2009
crochet Super Mario Brothers Star Pattern
Found this one last night on Shh, I'm counting. Very excited to make this one, even though I didn't play video games growing up.
 I used worsted weight yarn with a 3.5mm hook. Just make sure you're using a smaller hook than the yarn label recommends, and you should be ok. Trust me, the star looks better without bits of fiberfill poking through ;)
You don't have to join rounds, working in a spiral works just as well. I wrote this pattern when I was still very much new to crochet, and chose to join rounds because I thought it would make it easier to get the eyes to line up after. I've made a couple of stars recently without joining the rounds, and actually prefer it that way. I'm leaving the pattern unchanged though, so you can pick whichever method you want. If you still want to join the rounds, futuregirl made a very good tutorial on how to do it seamlessly - the end result looks so much better.
There's a Spanish translation available of this pattern too, thanks to Palitoz!
ch2
Round 1: 5 sc in second ch from hook. Join with sl st, turn (5sc)
Round 2: ch1, 2 sc in each sc around, join with sl st, turn (10sc)
Round 3: ch1, *sc in next sc, then 2 sc in next sc* repeat around, join with sl st, turn (15sc)
Round 4: ch1, *sc in next two sc, then 2 sc in next sc* repeat around, join with sl st, turn (20sc)
Round 5: Repeat round 3 (30sc)
First point:
Row 1: ch1, sc in next 6 sc,
Row 2: ch1, sc in each sc across, (6sc)
Row 3: ch1, sc2tog, sc in next 2 sc, sc2tog (4sc)
Row 4: repeat row 2
Row 5: ch1, sc2tog twice (2sc)
Row 6: ch1, sc2tog, fasten off
Second point:
Row 1: Attach yarn next to base of previous point. (Pull up a loop, ch1, sc in same st). Sc in next 5 sc.
Row 2-6: Same as first point.
Repeat second point 3 more times, do not fasten off after last point. Ch1, then sc around entire star. Join to first sc with sl st.
When you have made two star shapes, sew eyes on one of them, then whipstitch together, stuffing with fiberfill as you go.
I used worsted weight yarn with a 3.5mm hook. Just make sure you're using a smaller hook than the yarn label recommends, and you should be ok. Trust me, the star looks better without bits of fiberfill poking through ;)
You don't have to join rounds, working in a spiral works just as well. I wrote this pattern when I was still very much new to crochet, and chose to join rounds because I thought it would make it easier to get the eyes to line up after. I've made a couple of stars recently without joining the rounds, and actually prefer it that way. I'm leaving the pattern unchanged though, so you can pick whichever method you want. If you still want to join the rounds, futuregirl made a very good tutorial on how to do it seamlessly - the end result looks so much better.
There's a Spanish translation available of this pattern too, thanks to Palitoz!
ch2
Round 1: 5 sc in second ch from hook. Join with sl st, turn (5sc)
Round 2: ch1, 2 sc in each sc around, join with sl st, turn (10sc)
Round 3: ch1, *sc in next sc, then 2 sc in next sc* repeat around, join with sl st, turn (15sc)
Round 4: ch1, *sc in next two sc, then 2 sc in next sc* repeat around, join with sl st, turn (20sc)
Round 5: Repeat round 3 (30sc)
First point:
Row 1: ch1, sc in next 6 sc,
Row 2: ch1, sc in each sc across, (6sc)
Row 3: ch1, sc2tog, sc in next 2 sc, sc2tog (4sc)
Row 4: repeat row 2
Row 5: ch1, sc2tog twice (2sc)
Row 6: ch1, sc2tog, fasten off
Second point:
Row 1: Attach yarn next to base of previous point. (Pull up a loop, ch1, sc in same st). Sc in next 5 sc.
Row 2-6: Same as first point.
Repeat second point 3 more times, do not fasten off after last point. Ch1, then sc around entire star. Join to first sc with sl st.
When you have made two star shapes, sew eyes on one of them, then whipstitch together, stuffing with fiberfill as you go.
I used worsted weight yarn with a 3.5mm hook. Just make sure you're using a smaller hook than the yarn label recommends, and you should be ok. Trust me, the star looks better without bits of fiberfill poking through ;)
You don't have to join rounds, working in a spiral works just as well. I wrote this pattern when I was still very much new to crochet, and chose to join rounds because I thought it would make it easier to get the eyes to line up after. I've made a couple of stars recently without joining the rounds, and actually prefer it that way. I'm leaving the pattern unchanged though, so you can pick whichever method you want. If you still want to join the rounds, futuregirl made a very good tutorial on how to do it seamlessly - the end result looks so much better.
There's a Spanish translation available of this pattern too, thanks to Palitoz!
ch2
Round 1: 5 sc in second ch from hook. Join with sl st, turn (5sc)
Round 2: ch1, 2 sc in each sc around, join with sl st, turn (10sc)
Round 3: ch1, *sc in next sc, then 2 sc in next sc* repeat around, join with sl st, turn (15sc)
Round 4: ch1, *sc in next two sc, then 2 sc in next sc* repeat around, join with sl st, turn (20sc)
Round 5: Repeat round 3 (30sc)
First point:
Row 1: ch1, sc in next 6 sc,
Row 2: ch1, sc in each sc across, (6sc)
Row 3: ch1, sc2tog, sc in next 2 sc, sc2tog (4sc)
Row 4: repeat row 2
Row 5: ch1, sc2tog twice (2sc)
Row 6: ch1, sc2tog, fasten off
Second point:
Row 1: Attach yarn next to base of previous point. (Pull up a loop, ch1, sc in same st). Sc in next 5 sc.
Row 2-6: Same as first point.
Repeat second point 3 more times, do not fasten off after last point. Ch1, then sc around entire star. Join to first sc with sl st.
When you have made two star shapes, sew eyes on one of them, then whipstitch together, stuffing with fiberfill as you go.
Sunday, January 4, 2009
Crochet Shrug
This shrug looks so simple I have been dieing to whip one up, but I just haven't taken the time to yet. One day...
DIY Network
Crochet Shrug
Materials:
Forming the sleeves of the shrug:
Fold the piece in half lengthwise.
Line up the row, and sc tog across 16 rows (figure D). Ch 1, and end off.
Join yarn at opposite end with a sl st, ch 1, sc across 16 rows to close. Ch 1, end off.
 |
|

Red Heart Super Saver (#254, Pumpkin) crochet hook, US size P darning needle
Gauge: dc, ch 1, dc = 1-1/8"
Abbreviations: ch chain dc double crochet sl st slip stitch tog together
Ch 34 (or an odd number wide enough to go around the largest part of the arm) (figure A) (figure B).
)
 Figure A
| ) Figure B
Figure B
|
Row 1: Dc in the 4th ch from the hook, ch 1, skip 1 ch, dc in the next ch, *ch 1, skip 1 ch, dc in the next ch,* repeat from * across (figure C). Ch 4, turn. Row 2: (Note: Ch 4 serves as first dc and ch 1.) Skip ch, dc in the next dc, *ch 1, skip ch, dc in the next dc,* repeat from * across. When you reach the end, skip 1 ch, dc in the 2nd ch. Ch 4, turn. Repeat Row 2 to work 50 rows total. Ch 1. (Note: Do not end off.)
) Figure C
Figure C
| ) Shrug (detail)
Shrug (detail)
|
|
|

Finishing: Hide ends.
Crochet Shrug
 I would love to make this in a light blue bamboo yarn.
MODA-DEA
Crochet One Button Bolero
Crochet Hook: 5mm [US H-8].
2 Stitch markers, yarn needle, button, sewing
needle and thread.
I would love to make this in a light blue bamboo yarn.
MODA-DEA
Crochet One Button Bolero
Crochet Hook: 5mm [US H-8].
2 Stitch markers, yarn needle, button, sewing
needle and thread. 
GAUGE: 6 repeats of "sc, ch 3" = 4"; 12 rows = 4" in pat. CHECK YOUR GAUGE. Use any size hook to obtain the gauge.
To Fit Bust: 30-32 (34-36, 38-40)". Finished Bust: 32 1/2 (34 1/2, 36 1/2)".
Crochet Shrug
 MODA-DEA
Crochet Bolero
MODA-DEA
Crochet Bolero
Directions are for size Small; changes for sizes Medium, Large and Extra-Large are in parentheses. MODA DEA™ “Cheri™”: 5 (6, 7, 8) Balls No. 9762, Pink CA. Art.R125 (1.76 ounce/81 yard ball). MODA DEA™ “Curious™”: 3 (4, 5, 5) Balls No. 9547 Mauve CB.Art.R131 (1.76 ounce/78 yard ball). Crochet Hooks: 8mm [US L-11] and 11.5mm [P-16]. Stitch markers, yarn needle; one 1 1/4" button, sewing needle and thread.
GAUGE: 12 sts = 7"; 8 rows = 5" in pat with larger hook. CHECK YOUR GAUGE. Use any size hook to obtain the gauge.
To Fit Bust: 30-32 (34-36, 38-40, 42-44)". Finished Bust: 36 (41, 45 1/2, 50)". NOTE: When inc or dec, always beg and end row with a sc. BACK: With larger hook and holding 1 strand of CA and CB tog, ch 32 (36, 40, 44). Row 1 (Right Side): Sc in 2nd ch from hook, * ch 1, skip next ch, sc in next ch; rep from * across; turn – 31 (35, 39, 43) sts. Row 2: Ch 1, sc in first sc, ch 1, skip ch-1 sp, sc in next sc; rep from * across; turn. Rep Row 2 for pat until 5 1/2 (6, 6 1/2, 7)" from beg, end wrong side row. Shape Armholes: Sl st in first 3 (3, 5, 5) sts, ch 1, sc in same sc as last sl st, work in pat to last 2 (2, 4, 4) sts; turn – 27 (31, 31, 35) sts. Keeping continuity of pat, dec 1 st each end of next row then every other row 1 (2, 1, 2) times –23 (25, 27, 29) sts. Work even until armholes measure 7 (7 1/2, 7 3/4, 7 3/4)", end wrong side row. Divide for Neck:Work across 5 (6, 6, 7) sts. Fasten off. With right side facing, skip center 13 (13, 15, 15) sts, attach yarn in next st, work to end. Fasten off. FRONT (Make 2): With larger hook and holding 1 strand of CA and CB tog, ch 10 (12, 14, 16). Work same as back over 9 (11, 13, 15) sts. Mark one side "arm edge" and the other side "front opening". Keeping continuity of pat, inc 1 st at "front opening" side every row 6 times –15 (17, 19, 21) sts. Work even in pat until 5 1/2 (6, 6 1/2, 7)" from beg. Armhole and Front Neck Shaping-(Note: Read all directions in this section before beginning.): Keeping continuity of pat, shape armhole same as for back by dec 2 (2, 4, 4) sts at "arm edge" on next row, dec 1 st at same edge on next row then every other row 1 (2, 1, 2) times AND AT THE SAME TIME shape front neck by dec 1 st at "front opening" on next row then at same edge every other row until 5 (6, 6, 7) sts rem. Work even until front is same number of rows as back. Fasten off. SLEEVE (Make 2): With larger hook and holding 1 strand of CA and CB tog, ch 18 (20, 20, 22). Work in pat same as back over 17 (19, 19, 21) sts for 2 rows. Keeping continuity of pat, shape sides by inc 1 st at beg (beg, each end, each end) of next row then inc 1 st at beg (beg, each end, each end) of every 3rd row 3 times – 21 (23, 27, 29) sts. Work even in pat until 9 (9, 9 1/2, 9 1/2)" from beg. Shape Cap: Sl st in first 3 (3, 5, 5) sts, ch 1, sc in same st as last sl st, work in pat to last 2 (2, 4, 4) sts; turn – 17 (19, 19, 21) sts. Dec 1 st each end of next row, then each end of every other row 1 (1, 0, 0) times. Work 1 (1, 3, 3) rows even. Dec 2 sts each end of next 2 rows – 5 (7, 9, 11) sts. Fasten off. FINISHING: Sew shoulder, side and sleeve seams; set in sleeves. Cuff Edging-Rnd 1: With right side facing, 2 strands of CA, and smaller hook, attach yarn at a seam; ch 1, sc around opening; do not join. Rnds 2-4: Sc in each sc around. At end of Rnd 4, sl st in next st. Fasten off. Front Opening Edging: Mark buttonhole position on right front. Rnds 1-3:Work same as Cuff Edging, inc or dec as necessary around shaping to keep work flat and working Buttonhole on Rnd 3 as follows: sc to marker, ch 2, skip 2 sc, sc to end of rnd. Rnd 4: Sc in each sc and ch around; sl st in next sc. Fasten off. Sew button on left front. MODA DEA™ “Cheri™”, Art.R125 (1.76 ounce/81 yard ball). MODA DEA™ “Curious™”, Art.R131 (1.76 ounce/78 yard ball). ABBREVIATIONS: beg = beginning; CA, CB = Color A, Color B; ch = chain; dec = decrease; inc = increase; mm= millimeters; pat = pattern; rem = remaining; rep = repeat; rnd = round; sc = single crochet; sl = slip; st(s) = stitch (es); tog = together; * = repeat whatever follows the * as indicated.
Crochet Shrug
 Drops Design
Drops Crochet Bolero in Cotton Viscose
Drops Design
Drops Crochet Bolero in Cotton Viscose
DROPS Crochet Bolero in Cotton Viscose
" - Delicate bolero for socializing and party, but also a garment to decorate your everyday wear..."
Size: XS/S – S - M – L - XL - XXL
Materials: DROPS Cotton Viscose from Garnstudio
200-200-250-250-300-300 g colour no. 11, khaki green
and use
DROPS Vienna from Garnstudio
50-50-50-50-50 g colour no. 16, moss green
DROPS Crochet Hook size 4
DROPS Crochet Hook size 6 (for borders)
Max prices as of 05.01.2009:
DROPS COTTON VISCOSE - 2.20 GBP per 50 gr skein
Note: This pattern is written in British English. All measurements in charts are in cm. For conversion from cm to inch - click here. There are different terms for crocheting in British and American English. If this pattern includes crochet, click for "crochet terms" here.
Crochet gauge: 17 dtr x 6 rows = 10 x 10 cm
Crochet info: At the beginning of each row replace 1 dtr with 4 ch, and finish each row with 1 dtr in 4th ch from beginning of previous row. Crochet in each st and not in between.
Decreasing tips (applies to armhole and neck):
Dec as follows at beginning of row: replace 1 dtr with a sl st.
Dec as follows at end of row: Turn the piece when number of dtr to be dec are left on row and crochet next row.
Increasing tips (applies to slope at front): Increase new sts towards mid front by crocheting ch's in last st from previous row. Crochet the same number of ch's as the number of dtr's to be increased, but as the first dtr on next row is to be replaced by 4 ch, replace the last ch with 4 ch, i.e. if you are to increase 5 dtr crochet 8 ch, turn the piece, crochet 1 dtr in 5th ch from the hook and then 1 dtr in each of the remaining ch's, continue on row with 1 dtr in each dtr from previus row.
Back piece: Loosely crochet 80-88-99-112-123-136 ch using hook size 4 and Cotton Viscose.
Crochet the 1st row as follows: 1 dtr in the 5th ch from the hook, *skip 1 ch, 1 dtr in each of the next 3 ch* repeat from *-* but for size XS + S + L + XXL finish with 1 dtr in the last 2 ch’s (instead of the last 3 ch) and for size M + XL finish with 1 dtr in the last ch (instead of the last 3 ch’s) = 58-64-72-82-90-100 dtr. Now crochet 1 dtr in each dtr from previous row – see Crochet info. At the same time after 2-2-3-3-3-3 rows inc 1 dtr each side by crocheting 1 extra dtr in the last but one dtr each side as follows:
Size XS + S + M: on every other row, Size L + XL + XXL: on every 3rd row a total of 5-5-5-4-4-4 times = 68-74-82-90-98-108 dtr. When piece measures approx 20-21-22-23-24-25 cm dec for armhole each side on every other row – see Decreasing tips: 3-3-4-6-7-9 dtr’s 1 time, 2 dtr’s 0-0-1-1-2-3 times and 1 dtr 1-2-3-4-4-4 times = 60-64-64-66-68-70 dtr. When piece measures approx 35-37-39-41-43-45 cm (only 1 row left until finished measurements) crochet 1 row over only the outermost 20-21-21-21-21-22 dtr’s each side (i.e. do not crochet over the middle 20-22-22-24-26-26 dtr’s = neck). Cut the thread, piece measures approx 37-39-41-43-45-47 cm.
Left front piece: Loosely crochet 28-29-32-35-37-40 ch using crochet hook size 4 and Cotton Viscose.
Crochet the 1st row as follows: 1 dtr in the 5th ch from the hook, *skip 1 ch, 1 dtr in each of the next 3 ch* repeat from *-* but for size XS + M + XXL finish with 1 dtr in the last 2 ch’s (instead of the last 3 ch ) and for size L finish with 1 dtr in the last ch (instead of the last 3 ch’s) = 19-20-22-24-26-28 dtr. Now crochet 1 dtr in each dtr from previous row as for back piece, at the same time inc towards mid front on every other row (i.e. on every row towards mid front) – see Increasing tips: 5 dtr’s 1-1-2-2-2-2 times, 4 dtr’s 1-1-0-0-0-0 times, 3 dtr’s 0-0-0-1-1-2 times, 2 dtr’s 1-2-2-2-3-3 times and 1 dtr 1-1-2-2-2-2 times. At the same time inc at side as for back piece. At the same time when piece measures 20-21-22-23-24-25 cm – compare to back piece – dec for armhole as described for back piece. At the same time when piece measures 26-26-26-28-28-30 cm dec for neckline towards mid front on every row – see Decreasing tips: 7-8-8-9-10-10 dtr’s 1 time, 2 dtr’s 1 time and 1 dtr 3 times = 20-21-21-21-21-22 dtr left on shoulder. When piece measures approx 37-39-41-43-45-47 – compare to back piece – cut the thread.
Right front piece: As left front piece but mirrored.
Sleeve: Loosely crochet 66-70-74-78-82-86 ch using crochet hook size 4 and Cotton Viscose.
Crochet the 1st row as follows: 1 dtr in the 5th ch from the hook, 1 dtr in next ch, *skip 1 ch, 1 dtr in each of the next 3 ch* repeat from *-* = 48-51-54-57-60-63 dtr. Crochet 1-1-2-3-3-4 rows of dtr as before, at the same time inc 1 dtr each side on every other row by crocheting 1 extra dtr in the second but last dtr each side = 50-53-58-63-66-71 dtr. On next row dec for sleeve cap each side on every row – see Decreasing tips: 4 dtr’s 1 time, 3 dtr’s 1 time, and then 2 dtr’s each side until piece measures approx 10-11-13-17-19-21 cm. Cut the thread.
Assembly: Sew shoulder seams. Crochet sleeves to body using crochet hook size 4 and Cotton Viscose as follows: 1 dc in first st on sleeve, 2 ch, 1 dc in first st on back/front piece, 2 ch, 1 dc in dtr on sleeve, 2 ch, 1 dc in dtr on back/front piece etc. Crochet sleeve and side seams together in the same way.
Crochet border: Crochet a border round the opening of the bolero (i.e. up along both front pieces, round neck and along lower edge) using crochet hook size 6 and Vienna as follows: 1 dc in first st, *3 ch, skip approx 2.5 cm, 1 dc in next st*, repeat from *-* and finish with 3 ch and 1 sl st in first dc from beginning of round. NB! The border should be nice and even and not wavy.
Close the jacket with a brooch of button.
Diagram

box stich-Crochet
I love making blankets for Project Linus. They send the donated handmade security blankets to children who are seriously ill, traumatized, or otherwise in need of one. I have sent a few in to my local chapter coordinator. Their website has a ton of wonderful patterns and ideas for inspiration, but I am always looking to supplement my idea stash.
Here is a great simple pattern I found on About.com
Box Stitch Carriage Robe
Box Stitch Carriage Robe

(Approximate Size: 36" x 45")
Materials: 20 ozs. 4 ply knitting worsted yarn. Solid or variegated.
Crochet Hook Size I or any size needed to obtain gauge
Gauge: 1 Pattern = 1 inch
Chain 100. Work in pattern as follows:
ROW 1: 3 dc in 4th ch from hook, *skip 3 sts, 1 sc in next st, ch 3, 3 dc in same st; repeat from * ending with 1 sc in last st (24 patterns), ch 3, turn.
ROW 2: 3 dc in last sc of previous row, *1 sc over the ch 3, ch 3, 3 dc in same place; repeat from * ending with 1 sc in top of ch 3. Ch 3, turn.
Repeat ROW 2 until 55 rows have been completed. Do not break yarn. Continue in pattern, working across each side and lower edge - work one pattern for each ch of 3 at side and one pattern for each pattern across first row. Fasten off.
Subscribe to:
Posts (Atom)
