 top part of body:
rnd 1: ch 2, 6sc in 2nd ch, place marker
rnd 2: *2sc* around (12sc)
work in both loops from now on
rnd 3:*sc in next st, 2sc in next st* (18)
rnd 4: *sc in next 2st, 2sc in next st* (24)
rnd 5: *sc in next 3st, 2sc in next st* (30)
rnd 6: *sc in next 4st, 2sc in next st* (36)
rnds7-11: *sc*
rnd 12: *sc in next 4st, sc dec* (30)
rnd 13: *sc in next 3st, sc dec* (24)
rnd 14: *sc in next 2st, sc dec* (18)
rnd 15: *sc*
rnd 16: ch2 (counts as first hdc) 2hdc in same st, sc in next st
*3hdc in next st, sc in next st* join
finish off, weave in ends
bottom part of body:
rnd 1: ch 2, 6sc in 2nd ch, place marker
rnd 2: *2sc* around (12sc)
rnd 3: *sc in next st, 2sc in next st* (18)
rnds 4-5: *sc*
finish off leaving a long end for sewing to top part of body
stuff body, and sew bottom part to rnd 15 of body
legs: make 8:
rnd 1: ch 2, 6sc in 2nd ch, place marker
rnd 2: *2sc* around (12sc)
rnds 3-6: *sc*
finish off, leaving a long end for sewing to body
assembly:
stuff each leg lightly, sew closed
sew each leg to bottom piece of body, you may need to overlap the legs a bit or all eight won't fit
attach eyes between rnds 9 & 10 of body about 2" apart from each other
top part of body:
rnd 1: ch 2, 6sc in 2nd ch, place marker
rnd 2: *2sc* around (12sc)
work in both loops from now on
rnd 3:*sc in next st, 2sc in next st* (18)
rnd 4: *sc in next 2st, 2sc in next st* (24)
rnd 5: *sc in next 3st, 2sc in next st* (30)
rnd 6: *sc in next 4st, 2sc in next st* (36)
rnds7-11: *sc*
rnd 12: *sc in next 4st, sc dec* (30)
rnd 13: *sc in next 3st, sc dec* (24)
rnd 14: *sc in next 2st, sc dec* (18)
rnd 15: *sc*
rnd 16: ch2 (counts as first hdc) 2hdc in same st, sc in next st
*3hdc in next st, sc in next st* join
finish off, weave in ends
bottom part of body:
rnd 1: ch 2, 6sc in 2nd ch, place marker
rnd 2: *2sc* around (12sc)
rnd 3: *sc in next st, 2sc in next st* (18)
rnds 4-5: *sc*
finish off leaving a long end for sewing to top part of body
stuff body, and sew bottom part to rnd 15 of body
legs: make 8:
rnd 1: ch 2, 6sc in 2nd ch, place marker
rnd 2: *2sc* around (12sc)
rnds 3-6: *sc*
finish off, leaving a long end for sewing to body
assembly:
stuff each leg lightly, sew closed
sew each leg to bottom piece of body, you may need to overlap the legs a bit or all eight won't fit
attach eyes between rnds 9 & 10 of body about 2" apart from each other
Sunday, March 1, 2009
octopus amigurumi
This was one of the first amigurumi patterns that I plaid with. Link here.
top part of body:
rnd 1: ch 2, 6sc in 2nd ch, place marker
rnd 2: *2sc* around (12sc)
work in both loops from now on
rnd 3:*sc in next st, 2sc in next st* (18)
rnd 4: *sc in next 2st, 2sc in next st* (24)
rnd 5: *sc in next 3st, 2sc in next st* (30)
rnd 6: *sc in next 4st, 2sc in next st* (36)
rnds7-11: *sc*
rnd 12: *sc in next 4st, sc dec* (30)
rnd 13: *sc in next 3st, sc dec* (24)
rnd 14: *sc in next 2st, sc dec* (18)
rnd 15: *sc*
rnd 16: ch2 (counts as first hdc) 2hdc in same st, sc in next st
*3hdc in next st, sc in next st* join
finish off, weave in ends
bottom part of body:
rnd 1: ch 2, 6sc in 2nd ch, place marker
rnd 2: *2sc* around (12sc)
rnd 3: *sc in next st, 2sc in next st* (18)
rnds 4-5: *sc*
finish off leaving a long end for sewing to top part of body
stuff body, and sew bottom part to rnd 15 of body
legs: make 8:
rnd 1: ch 2, 6sc in 2nd ch, place marker
rnd 2: *2sc* around (12sc)
rnds 3-6: *sc*
finish off, leaving a long end for sewing to body
assembly:
stuff each leg lightly, sew closed
sew each leg to bottom piece of body, you may need to overlap the legs a bit or all eight won't fit
attach eyes between rnds 9 & 10 of body about 2" apart from each other
pencil case from mailing tube
This one is from Craft Chi Office Crafts

Materials: - Mailing Tube w/2 endcaps - Fabric remnants - Small hinges and clasp (used for small wooden boxes) - Brads and eyelets (the scrapbook types work great) - Appx. 2 feet of ribbon (optional for handles) - Spray paint for plastic or spray paint and plastic primer (optional) - Spray Adhesive - Glue Stick - A piece of cardstock or a cereal box
Tools: - Iron - Small hacksaw (or heavy duty scissors and hand strength work too) - Small vice (if using a hacksaw) - Awl - Eyelet setter (optional) - Leather punch (optional)
1. Cut the mailing tube to desired length. Secure the tube in a vice and cut using a small hacksaw. Mine is about 8″ long. Make sure it’s long enough for the pens/pencils you want to put into it. Heavy duty scissors also work but require more hand strength.

2. Cut the tube in half lengthwise. Once again, using the vice to hold the tube in place. Make sure to mark a straight line if using scissors.

3. Sand the edges, gently, just to remove any rough bits, using a fine grit sand paper.

4. Prep the outside fabric. Cut a piece of fabric 2″ longer and wider than the size of each tube half to allow for a 1″ overlap on all sides. I pieced together this fabric because I liked the look.

5. Adhere the outside fabric by spraying adhesive on the outside of the tube and centering the fabric on it. Then wrap the extra fabric around to the interior and secure with glue stick. Glue the corners first and then glue the sides to get a nice mitered corner.

Here the pieces are after they’ve been covered.

6. Prep the interior fabric. Cut a piece of fabric to the exact size of the interior each half of mailing tube. Then, use glue stick to fold in the sides by 1/2 inch.
When glueing, a piece of wax paper under the fabric allows you to put glue on the edge.

Fold the fabric in by 1/2″ and press down. I used my cutting mat to help me get the fold nice and even.

Iron the fold to set it more securely. Do this to all 4 sides.

7. Adhere the interior fabric. Now spray the wrong side of the fabric with spray adhesive and attach to the interior of the tube half.

8. Prep the tube caps. Spray paint the tube caps (optional) using a spray paint suitable for plastic or use a clear plastic primer first. Allow each coat to dry thoroughly.

9. Cover the endcaps with fabric. Use the larger side of the endcap to trace a circle onto cardstock. Cut the circle out using scissors.

Use glue stick to glue the cardstock circle onto a piece of fabric.

With the glue stick, put glue along the edges of the circle and fold the fabric over the edges. Iron to set.

10. Glue the fabric circle to the endcap. Squeeze craft glue around the rim edge of the endcap and place your fabric circle on the glue. Allow to dry thouroughly.

11. Once the fabric circle is glued down and dry. Glue the endcap to inside end of one half of the tube. Put craft glue on the interior of the short side of one half of the tube and set the covered, endcap in place.

Glue the endcap to the end of one half of the tube. Now, glue the other endcap to the other end of the same half.

12. Attach the hinges. Measure and mark the location of your hinges on the long side edges of the tube halves.

Use an awl to drive a hole through the tube and fabric.

Secure the hinges with decorative brads.

Secure the brads on the inside of the tube by folding them over. Here’s a view of the brads from the inside of the case.

13. Attach the clasp the same way as the hinges. Measure and mark, then use an awl to punch the holes and secure with brads.

14. Create the handles. Measure and mark where you’d like the handles to be.

Punch larger holes using a leather punch or a snap-setter/punch.

Insert and set eyelets.


Insert a piece of ribbon for the handle. Secure with a knot on the interior.

This case has plenty of space to be used as small purse or a lunch box.
Tuesday, February 3, 2009
knitted hat pattern
I'm not really a hat person, spend too much time trying to get my hair to lay perfectly flat. But I thought this one was really cute, and the girl looks just like someone I went to high school with. Anyway... I got this pattern from a live journal post at some point.
Materials:
Less than half of a 6-oz skein of TLC Baby in Pinkie
Set of double-pointed needles US size 6 (4 mm)
Tapestry needle
Gauge: 18 sts per 4 inches in k2tog,yo pattern
Size: I have a large head and thick hair (about 23" around), and this cap is made to fit loosely. So if you have a smaller head or want a tighter fit, you can either subtract 4 sts for every inch (approx) difference in head size, or just use thinner yarn with a tighter gauge to get the right fit. Or you can make it as is, and it might turn out with more of a beret or tam look.
Cast on 108 sts and distribute to 3 dpns (36 on each). Join to work in the round, being careful not to twist. Work 6 rounds in k2,p2 ribbing.
Lace Pattern:
Round 1: *k2tog, yo*; repeat between*s around.
Round 2: knit around.
Repeat these 2 rounds 17 more times.
Crown Shaping:
Round 1: *k2tog, [k2tog, yo] 8 times*; repeat between *s around - 102 sts rem.
Round 2 and all even rounds: knit around.
Round 3: *k3tog, yo, [k2tog, yo] 7 times*; repeat between *s around - 96 sts.
Round 5: *k2tog, [k2tog, yo] 7 times*; repeat between *s around - 90 sts.
Round 7: *k3tog, yo, [k2tog, yo] 6 times*; repeat btween *s around - 84 sts.
Round 9: *k2tog, [k2tog, yo] 6 times*; repeat between *s around - 78 sts.
Round 11: *k3tog, yo, [k2tog, yo] 5 times*; repeat btween *s around - 72 sts.
Round 13: *k2tog, [k2tog, yo] 5 times*; repeat between *s around - 66 sts.
Round 15: *k3tog, yo, [k2tog, yo] 4 times*; repeat btween *s around - 60 sts.
Round 17: *k2tog, [k2tog, yo] 4 times*; repeat between *s around - 54 sts.
Round 19: *k3tog, yo, [k2tog, yo] 3 times*; repeat btween *s around - 48 sts.
Round 21: *k2tog, k2tog, yo*; repeat between *s around - 36 sts.
Round 23: *k3tog, yo*; repeat between *s around - 24 sts.
Round 25: *k2tog, k2tog, yo*; repeat between *s around - 18 sts.
Round 27: k2tog around - 9 sts.
Cut yarn, leaving a 6-inch tail. Use tapestry needle to thread end through remaining loops. Put tight and tie off. Weave in ends.
Quant or scarf
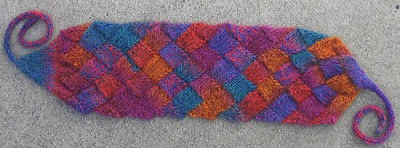 This is one of my favorite patterns. At first it was impossibly hard, but eventually it got much easier. It's similar to the pattern that I posted for dish-cloths. I followed this pattern for a Quant that I found on Knitty and adapted it for a scarf.
I used the same Crystal Palace Yarns: Taos that they used in the picture. If I was to do it again I would probably use something else. It wasn't very soft (especially since I was making a scarf) and it was impossible to undo. I can't tell you how much i wasted trying to take apart what I had done and not being able to. I defiantly wont try and learn a new and complex pattern with that yarn. But, in its defense, it is beautiful, these pictures do not do it justice at all. And the length of the variegate is perfect for this pattern.
This is one of my favorite patterns. At first it was impossibly hard, but eventually it got much easier. It's similar to the pattern that I posted for dish-cloths. I followed this pattern for a Quant that I found on Knitty and adapted it for a scarf.
I used the same Crystal Palace Yarns: Taos that they used in the picture. If I was to do it again I would probably use something else. It wasn't very soft (especially since I was making a scarf) and it was impossible to undo. I can't tell you how much i wasted trying to take apart what I had done and not being able to. I defiantly wont try and learn a new and complex pattern with that yarn. But, in its defense, it is beautiful, these pictures do not do it justice at all. And the length of the variegate is perfect for this pattern. Here is how I retyped the pattern so it was easier for me to follow when knitting a scarf from it. I never was able to finish it, so I haven't yet figured out how I'm going to fill in to bind off. If anyone gets there before me, let me know
Cast on 45 stitches
Base Triangle
Row 1 [RS]: K1, turn work.
Row 2 [WS]: P1, turn work.
Row 3 [RS]: Sl 1, k1, turn work.
Row 4 [WS]: P2, turn work.
Row 5 [RS]: Sl 1, k2, turn work.
Row 6 [WS]: P3, turn work.
Row 7 [RS]: Sl 1, k3, turn work.
Row 8 [WS]: P4, turn work.
Row 9 [RS]: Sl 1, k4, turn work.
Row 10 [WS]: P5, turn work.
Row 11 [RS]: Sl 1, k5. Do not turn work.
---Repeat the below instructions about ten times---
Left Edge
Row 1 [WS]: K1, turn work.
Row 2 [RS]: Kfb, turn work.
Row 3 [WS]: K1, p2tog, turn work.
Row 4 [RS]: K1, m1, k1, turn work.
Row 5 [WS]: k1, p1, p2tog, turn work.
Row 6 [RS]:
Right Slanting Center Diamond
Row 1 [WS]: Pick up and p 6 sts along edge of next base triangle. Sl last picked-up st to left needle, p2tog with next st on needle. Turn work.
Row 2 [RS]: K6, turn work.
Row 3 [WS]: Sl 1, p4, p2tog, turn work.
Row 4 [RS]: K6, turn work.
Row 5 [WS]: Sl 1, p4, p2tog, turn work.
Row 6 [RS]: K6, turn work.
Row 7 [WS]: Sl 1, p4, p2tog, turn work.
Row 8 [RS]: K6, turn work.
Row 9 [WS]: Sl 1, p4, p2tog, turn work.
Row 10 [RS]: K6, turn work.
Row 11 [WS]: Sl 1, p4, p2tog. Do not turn work; diamond is complete.
Right edge Triangle
Note: The remaining st of the Right Edge Triangle from Section 1 counts as the first picked-up st for the first diamond in Section 2. When working this diamond, instead of picking up 6 sts, slip the remaining st to the right needle, then pick up and k 5 sts.
Row 1 [WS]: Pick up and p6 sts along edge of next base triangle or diamond. Turn work.
Row 2 [RS]: K6, turn work.
Row 3 [WS]: Sl 1, p3, k2tog, turn work.
Row 4 [RS]: K5, turn work.
Row 5 [WS]: Sl 1, p2, k2tog, turn work.
Row 6 [RS]: K4, turn work.
Row 7 [WS]: Sl 1, p1, k2tog, turn work.
Row 8 [RS]: K3, turn work.
Row 9 [WS]: Sl 1, k2tog, turn work.
Row 10 [RS]:
Left Slanting Diamond
Row 1 [RS]: Pick up and k6 sts along edge of next triangle or diamond. Sl last picked-up st to left needle, ssk with next st on needle. Turn.
Row 2 [WS]: P6, turn work.
Row 3 [RS]: Sl 1, k4, ssk, turn work.
Row 4 [WS]: P6, turn work.
Row 5 [RS]: Sl 1, k4, ssk, turn work.
Row 6 [WS]: P6, turn work.
Row 7 [RS]: Sl 1, k4, ssk, turn work.
Row 8 [WS]: P6, turn work.
Row 9 [RS]: Sl 1, k4, ssk, turn work.
Row 10 [WS]: P6, turn work.
Row 11 [RS]: Sl 1, k4, ssk.
Do not turn work; diamond is complete.
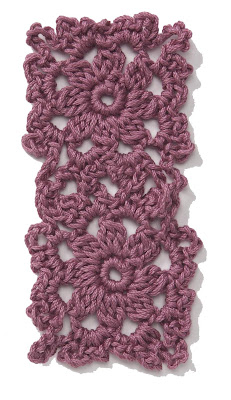
crochet stich
Here is a pretty crochet stitch from Lion Brand Yarn called Alone Together. It is one of the hundreds that they have in their Stitch-Finder section. You may have to have a free account with them to access their patterns and stitches. Wouldn't this make an adorable blanket?
 CL2 (2-dc Bobble) [Yo and draw up a lp, yo and draw through 2 lps on hook] twice, yo and draw through all 3 lps on hook.
CL3 (3-dc Bobble) [Yo and draw up a lp, yo and draw through 2 lps on hook] 3 times, yo and draw through all 4 lps on hook. First Motif (ch 4, join with sl st to form ring)
Rnd 1 Ch 1, 8 sc in ring, join with sl st to first sc.
Rnd 2 (Ch 3, CL2) in first sc, ch 4, [CL3 in next sc, ch 4] 7 times—8 clusters. Join with sl st to top of beg CL2.
Rnd 3 Sl st in first ch-4 sp, ch 1, *(1 sc, ch 2, 1 sc, ch 4, 1 sc) in next ch-4 sp, ch 8, (1 sc, ch 4, 1 sc, ch 2, 1 sc) in next ch-4 sp; rep from * around. Join with sl st to first sc. Fasten off. Second and All Remaining Motifs Work as first motif through rnd 2. Joining
Work rnd 3 as first motif, joining motifs in corresponding ch-8 corners or ch-4 lps as foll:
Ch-8 Corners Ch 4 on rnd 3 of 2nd motif, drop lp from hook, insert hook from front to back through corresponding ch-8 lp on first motif, pick up dropped lp of 2nd motif, ch 4, cont to work rnd 3 on 2nd motif as established.
Ch-4 Lps Ch 2 on rnd 3 of 2nd motif, drop lp from hook, insert hook from front to back in corresponding ch-4 lp on first motif, pick up dropped lp of 2nd motif, ch 2, cont to work rnd 3 of 2nd motif as established.
CL2 (2-dc Bobble) [Yo and draw up a lp, yo and draw through 2 lps on hook] twice, yo and draw through all 3 lps on hook.
CL3 (3-dc Bobble) [Yo and draw up a lp, yo and draw through 2 lps on hook] 3 times, yo and draw through all 4 lps on hook. First Motif (ch 4, join with sl st to form ring)
Rnd 1 Ch 1, 8 sc in ring, join with sl st to first sc.
Rnd 2 (Ch 3, CL2) in first sc, ch 4, [CL3 in next sc, ch 4] 7 times—8 clusters. Join with sl st to top of beg CL2.
Rnd 3 Sl st in first ch-4 sp, ch 1, *(1 sc, ch 2, 1 sc, ch 4, 1 sc) in next ch-4 sp, ch 8, (1 sc, ch 4, 1 sc, ch 2, 1 sc) in next ch-4 sp; rep from * around. Join with sl st to first sc. Fasten off. Second and All Remaining Motifs Work as first motif through rnd 2. Joining
Work rnd 3 as first motif, joining motifs in corresponding ch-8 corners or ch-4 lps as foll:
Ch-8 Corners Ch 4 on rnd 3 of 2nd motif, drop lp from hook, insert hook from front to back through corresponding ch-8 lp on first motif, pick up dropped lp of 2nd motif, ch 4, cont to work rnd 3 on 2nd motif as established.
Ch-4 Lps Ch 2 on rnd 3 of 2nd motif, drop lp from hook, insert hook from front to back in corresponding ch-4 lp on first motif, pick up dropped lp of 2nd motif, ch 2, cont to work rnd 3 of 2nd motif as established.
beaded hair thingy
Here is a really cute beaded hair thingy. Its from the free ideas and instructions section of Fire Mountain Gems. They are the first place I go to for anything bead related. They sell EVERYTHING, and have a great idea section.
Materials
6mm glass beads (if making a hair thingy)
about 2 yards of size D thread, doubled
2 size 10 needles
1 hair stick
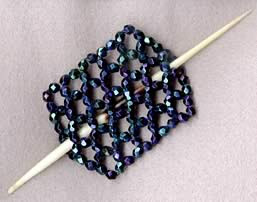
 In the illustrations below, the green arrow represents the direction of needle A and the red arrow represents the direction of needle B.
Just follow the steps shown in the illustrations below. When you are finished, weave your threads back through your bead and tie off.
This design makes a great bracelet also, just use size 4mm beads and make it long enough to go around your wrist.
In the illustrations below, the green arrow represents the direction of needle A and the red arrow represents the direction of needle B.
Just follow the steps shown in the illustrations below. When you are finished, weave your threads back through your bead and tie off.
This design makes a great bracelet also, just use size 4mm beads and make it long enough to go around your wrist.


Step 1
Step 2
Step 3
Step 4
Step 5
Step 6
Step 7
Step 8
Step 9
Step 10
Step 11
Step 12
Step 13
Step 14
coloring pages-Letters
I print a ton of free coloring pages off the internet. Between myself, my roommates, and my coworkers we go through hundreds destressing. I found these letter coloring pages and thought they would be handy at some point.
I found them on Barb's Galaxy, Here is the link to all of the letters. There are many more coloring pages under Coloring Pages for All Ages.
Here is an example page of A's.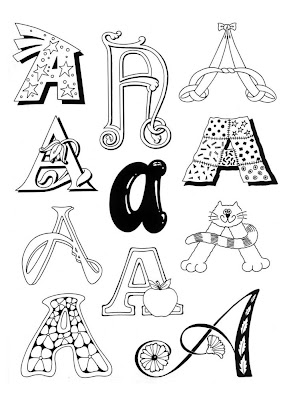

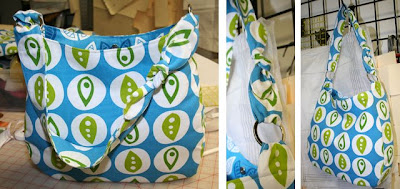
Hobo Bag
Here is another bag that I found that same day. Unfortunately my sewing machine is in an unheated and uncooled room of the house, so my sewing days are quite limited by the weather. One day I will get around to making this number.
This bag and the tutorial can be found on J Caroline Creative.
 My new goal is to provide links to the sites instead of copying the instructions here. I really hope this doesn't come back to bite me in the you-know-where.
***alright change of plans. I lost yet another pattern to an old link. Sorry everyone, I'm copying the stuff here. If it really comes down to it, I'll make this a private blog so no one else can see it. Until then, I hope that I give enough credit and attempt to provide enough links that I can keep the complaints at bay.
My new goal is to provide links to the sites instead of copying the instructions here. I really hope this doesn't come back to bite me in the you-know-where.
***alright change of plans. I lost yet another pattern to an old link. Sorry everyone, I'm copying the stuff here. If it really comes down to it, I'll make this a private blog so no one else can see it. Until then, I hope that I give enough credit and attempt to provide enough links that I can keep the complaints at bay.
Materials Needed:
| |
 | Put together the pattern matching the circles. The pattern pages overlap by 1/2". Then cut your material following the pattern instructions. |
 | I trim down my interfacing about 1/4" all the way around so that I can follow the fabric edge when I sew. Place the exterior fabric right side down on a flat surface and pin the interfacing to the fabric. |
 | Baste (the longest stitch on your matchine) the interfacing to your fabric, between the seam allowance and the edge. I like to sew mine with the interfacing side up, as it tends to feed more evenly. |
 | Now stitch the bottom/side pieces together using a 1/2" seam allowance. Stitch on the end closest to the notches. |
 | About 1/2" before and after the notches, clip to just short of the seam allowance (1/2"). An apparel sewer would clip more than that, but I get nervous because I sometimes clip too far and everytime I clip I feel like I'm just adding a new place for the fabric to unravel. |
 | Now pin one side of the bag to the bottom/side piece. Don't panic- I took a picture of the inside of this bag, but you are still working on the exterior piece. Match the center seam of the bottom/side piece with the center notch on the bag front. Then match the notches on the curves as you curve the side piece around. Note that I pinned the bag on opposite sides. That is because I stitched from the center and sewed around to the top and did the same for the other side. I found my curves came out more uniform when I sewed them from the same direction, and if your fabric shifts as you sew, you are only dealing with half of your seam at a time, reducing the chance of the shape getting really wonky. Also, when you sew, stop your stitching 1/2" from the top of the front and back of the bag and backstitch to secure your stitching. Repeat this process for the other side of the bag. And if your ends don't end up meeting perfectly, we can adjust that later. (On one side, my front and back pieces were 1/2" off.) |
 | The side piece that extends beyond the bag will be used to attach the round hardware. Pin under the 1/2" seam allowance along the sides. Then top stitch from the top to where this piece is attached to the purse front and back. (That's why you stopped stitching 1/2" from the edge in the last step- so you can treat those "loops" separately from the bag.) Note that I showed you the side of the bag in this photo where the front and the back of the bag match. You'll see the wonky one later. |
 | The next two pictures I actually did in reverse order, but do I say, not as I did. (Because I had to go back and redo.) Now you can turn down the top of the bag in the front and back 1/2" and pin in place. |
 | Place your hardware on the strips of fabric and turn down the "loops" about 1 1/2" inches from where they are sewn to the front and back and pin in place. Since you nicely turned down the front and back seams first, you can tuck those raw edges under the loops. By the way, this is the side where the back and front side did not meet at the same point on the side. I adjusted that by just turning down more of a seam allowance on the one that came up too high. You can't tell when you look at the bag straight on and now it is even with the front when you look at it from the side. Of course, you can't see the finished result in this picture, because I hadn't done that part yet, though I should have. |
 | Here you can see the inside of the bag after I adjusted the seam allowance on the one side. You can also see how the raw edges from the front and back are hidden underneath the loop. Now you can baste all around the top of the bag. When you get to the sides, just connect the stitching from the front to where you will start stitching on the back. |
| I don't have a picture for this step, as the ones I took were worthless. I cut a piece of closed cell foam 2" x 18". I marked the center (at 9") and glued it to the inside of the bag bottom to provide some structure. However, I'm not very confident with that method. It was difficult to get the foam to stick and I'm very suspicious with wear and tear it will separate from the bottom and just float around in the purse. So here is what I have done in the past and I should have done here. Take some scrap fabric and cut two pieces about 2" wider and longer than the foam (in this case, 4" x 20"). Enclose the foam in the fabric and stitch all the way around. If you use your zipper foot, you can sew very close to the foam. Then, you can turn the exterior bag wrong side out and stitch the sides (the 18" long ones) to the purse seam allowances. Now the bottom of your bag won't sag oddly depending on what you put in it and the foam will stay put no matter what. Trim your seam allowances down to about 1/4". | |
 | Now you will start working on the interior bag. I decided to put in a zippered pocket, but if that freaks you out, but all means skip it or just sew in a patch pocket. But, it is not as hard as you might think. Take the piece of fabric you cut for the pocket and place it wrong side up. 10" is the width, 12" is the height. 2" from the top, mark a rectangle (centered width-wise) that is 8 1/4" long and 1/2" wide. Now pin the pocket fabric to the interior back piece, right sides together, placing the pocket approximately 1/2" from the top. Stitch around the rectangle, using a very small stitch length on the short ends and corners. |
 | Carefully cut down the center of the rectangle and about 1/2" from the ends, clip toward the corners as close as you can without clipping the stitching. That corner clip determines how smooth the zipper rectangle will be. |
 | Turn the pocket material right side out through the zipper hole you just cut. Using your iron and steam, press the rectangle flat, working the pocket fabric until it is hidden when viewed from the front side. |
 | Flip back the sides of the interior fabric, revealing the little triangle formed by your clipping. Stitch across the triangle to secure as shown by the black line. |
 | Place the zipper under the rectangular hole and pin. Stitch around the rectangle (about 1/8" from the edge) to secure the zipper. |
 | Fold the pocket fabric in half (parallel with the zipper) and pin on three sides. Stitch to form the pocket. |
 | Assemble the interior of the bag the same way you assembled the exterior, with a couple of minor changes. Since you want this bag to fit neatly inside the exterior bag, use a seam allowance a "tad" over 1/2". (Tad is a technical term indicating a small measurement. So stitch a seam allowance somewhere between 1/2" and 5/8".) And when you stitch the side/bottom piece to the front and back, you can stitch all the way to the end of the side pieces. Trim your seam allowances. |
 | Place the interior bag inside the exterior bag, wrong sides together. Fold under a 1/2" seam allowance on the interior bag, and adjust the seam allowance where necessary to make it fight nicely within the exterior bag. Pin in place. Before the interior and exterior bag can be sewn together, the magnetic snap needs to be installed. Find the center of the front or back interior piece of the bag. Cut two small slits about 1/8" long to fit the prongs of the snap. Apply fraycheck, if desired, to keep the holes from raveling or ripping. Undo any pinning that gets in your way and install the pointy side of the snap through the slits and slip the backing onto the snap inside the bag. Bend the prongs outward to hold the snap. Now mark the pointy part of the snap with grease pencil or chalk. Hold the purse so that the sides are even and rub the snap against the other side (as shown in the picture). Now you can install the magnetic part of the snap on the other side using the chalk mark as your guide. Repin any pins your removed. |
 | Stitch around the entire top of the bag. I changed my bobbin thread to match the interior bag. Make sure you have sewn the interior and exterior bag together at all points around the bag. Remove the basting stitch you put in earlier. |
 | Place the short straps right sides together. Stitch together using a 1/2" seam allowance, leaving the bottom open. Trim the seam allowance to 1/4". Using a dowel rod or the handle of a wooden spool, turn the strap right side out. Use your iron and steam to press the strap flat. Use your fingers to work the seams open. On the bottom of the strap, fold the 1/2" seam allowance towards the inside and press in place. Topstitch all around the strap. Repeat the same for the long strap. |
 | This picture shows both straps sewn together and topstitched ready to sew onto the bag. |
 | Place the straight edge of the strap through the ring hardware and stitch about 1 1/2" from the ring. Repeat for the other strap. Then tie the ends into a square knot. |
| 1 Closed cell foam is a dense, thin foam that doesn't compress much. It is usually black, blue or white. It is not the cushy yellowish foam you find in your seat cushions. Where do you find closed cell foam? The easiest solution if you want just a little is to buy Foamies or another brand of foam sheets at a craft store and glue them together to get a thickness of a 1/4" or so. If you want closed cell foam in bulk, find a marine or auto upholstery business. If you're lucky, maybe they will give you a small piece to play with before you commit to a 10 yard roll! I'm sure you could also find it on the internet, but it is bulky (and thus expensive) to ship. If you can't find any closed cell foam, your next best option is chair cushion foam or cardboard. The disadvantage of chair cushion foam is it has to be thicker (like 1") to provide any rigidity. The disadvantage of cardboard is if it gets crushed or bent, it doesn't recover. It also disintegrates when wet. | |
Subscribe to:
Comments (Atom)
